The Studio Artist 4 paint synthesizer is capable of creating an extremely wide range of different paint styles. This post is going to focus on discussing some editing techniques you can use to fine tune the appearance of Path Start Regionization painting effects.
Path Start Regionization is an intelligent process where Studio Artist visually analyzes a source image, breaking it up into a series of individual regions that are then painted in one by one to build a finished painting. This is in contrast to the more normal paint synthesizer path generation techniques that focus on selectively adding individual paint strokes one by one across the entire image to build a painting over time.
The Studio Artist paint synthesizer intelligently chooses starting points for paint strokes, builds a drawing path for the stroke, then paints in the generated path by applying nibs of paint on a virtual brush to the canvas while following the path. We'll follow this series of conceptual steps that are happening internally in the paint synthesizer to generate a painting below, detailing some editing options you can work with to fine tune the visual appearance of regionization painting effects.
Breaking the Image into Regions
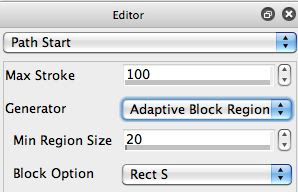
There are a number of different Path Start Generators that can be used to build regionization effects. They include the Watershed, Adaptive Block, Color Simplify, Cellular, Cell Partition, and HV Partition Regionize generator options in the Path Start control panel.
Each of these regionize path start options first intelligently analyze the source image, and then split it into a series of individual regions. Each approach generates a different characteristic visual look associated with how the individual regions are laid out to partition the image. The best way to get a feel for what they do is to try them out on a source image and see how they break it apart. You can work with the Max Stroke setting to vary the number of generated regions.
Most of these generator options are available with a normal and DM variation. The DM variations provide a tighter rendition of the source image, and work by breaking each initially generated region into 2 pieces. The region splitting is an additional intelligent process that tries to split each region in a way that best reproduces additional detail in the source image. Using the DM regionize generator options is a way to generate a tighter rendition of the original source image in the final painting.
Generating Paths to Fill the Regions
Each generated region can be painted in with a variety of different region fill patterns. How the region is filled in when painting is a function of the Path Shape control panel settings.
For path start regionization painting effects you will want to use a Path Type set to either the Path Start Regionize or Path Start Regionize Use RegionDraw Pen Gen options. These are special path shape generators that are especially designed to fill the generated path start regions. Each one has a number of additional editing options associated with it that determine the visual appearance and style of the resulting paint path region fill pattern.
The Path Start Regionize Use RegionDraw Pen Gen option uses the RegionDraw pen mode Region Fill Type patterning to fill the generated region. For all of the examples in this tutorial we're using the Outline Fill pattern type for the Path Start Regionize path type. This fill pattern draws a series of concentric outline paths that move from the region boundary inward to fill in the complete region with paint.
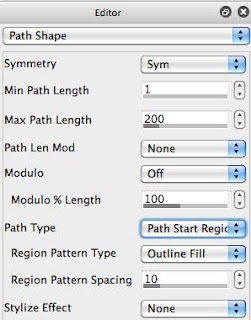
Depending of the brush size you are working with, you will probably want to adjust the Region Pattern Spacing accordingly. This option set the spacing between adjacent region fill paths. Adjusting this parameter lets you set the amount of paint overlap or the gap in paint associated with the region pattern fill. If you are working with multipen mode then the spread of the multipen virtual brush is another factor to take into account, since a multipen is composed of N individual source brush nibs virtually spaced to simulate a wider brush with individual bristles.
Painting the Region Paths
You can turn any paint preset into a paint regionization effect by using the Path Start and Path Shape options described above. However, there are additional editing techniques you can use to fine tune the visual appearance of the resulting painting. Depending on your aesthetic goals you may want to build additional detail in your painting, or perhaps go the other direction and go for a more blocky abstract look. You also have a wide range of different coloring options that can be used to emulate different impressionist coloring styles, map a painting to a particular aesthetic color palette, accurately reproduce your original source colorings, or to go boldly where no one has gone before.
The paint synthesizer automatically sets the current region selection to temporarily match each of the individual regions it is painting. This means that you can take advantage of any paint synthesizer modulation settings that work off of the current region selection to mask or otherwise influence the appearance of each individual region as it's painted in a variety of different ways.
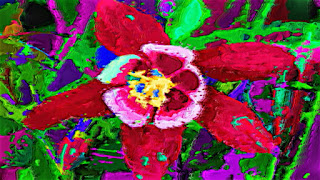
We'll work through a series of examples below using the same source image and adaptiveBlock regionization generator. The adaptiveBlock generator breaks the source image up into a series of adaptively positioned rectangular blocks. The regular nature of this region generation process will be useful as an aid to see how the various masking options we will be discussing below affect the appearance of the finial paintings. Other generator options like the watershed regionize can break the image into regions that more closely map the source image contour areas of local color and shape. We'll be using the DM variation of this generator for most of the examples, which as previously explained breaks each rectangular region into 2 pieces to better reproduce source image detail.
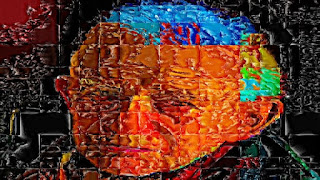
If you want a really tight rendition, you can mask each of the individual paint nibs to the current path start region. You can do this by using the if Region option for the Nib Masking parameter in the Paint Fill Apply control panel.
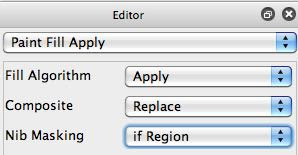
As seen in the example below, this leads to a very hard masking effect, since each individual paint nib is hard masked when it's at the edge of the current path start region being painted in.
Sometimes this may be just what you are looking for, but there are other approaches to region masking that can lead to a smoother and more natural painted appearance. Path masking (as opposed to nib masking) leads to a more natural appearance for a painting because the drawing path will matchup to the region boundaries but the entire brush nib will paint at the border of the region.
Using the Path End controls is one approach to masking a paint path, but those controls stop the path generation process. What we want is to mask a paint path when it's outside of a region boundary but to not end painting the path if a boundary is crossed (since the path may come back into the region again if it has a complex shape).
So what we're looking for is a Path Application control panel modulator. Fortunately there is one. The Probability option in the Path Application control panel has a Current Selection option. Using this will mask each generated region path so that in any places where it moves outside of the region boundary, painting will be auto-masked.
Again, we're masking the entire application of the paint nib along the path with the controls in this panel, so the entire paint nib will draw at the region boundary. As you can see in the example below, the appearance of the finished painting is more natural than the previous example that uses hard nib masking.
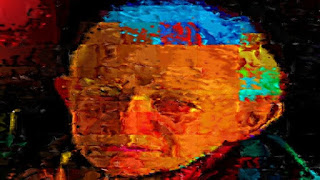
If we turn off the current selection probability masking and the nib masking and let the full regions draw, we get the following looser painted appearance below. Again, we're still using the adaptiveBlock DM path start generator and an outline fill path shape patterning.

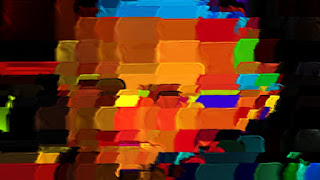
To make the paintings appearance even more abstract, we can switch from the adaptiveBlock DM path start generator to the adaptiveBlock generator. Remember that the DM option means that the original region is split into 2 pieces that try to accurately reproduce the source image features. Removing the DM option for this adaptiveBlock regionize generator means that we get rectangular blocks with no additional splitting as shown below. Note how this final image has a very abstract appearance, and has lost a lot of the source image detail seen in the previous examples.
In the proceeding section we moved from an initial very tight representation of the source image through a series of looser more natural paintings to a final very blocky and abstract painted appearance. So it should be obvious that by working with the paint synthesizer editing controls discussed above you have an extremely wide range of personal control over the appearance of regionization paint styles. There are also many more editing options available to you in the Studio Artist paint synthesizer for customizing the appearance of your digital paintings.
All of the examples above used the same individual oil paint preset, which is just one of the thousands of factory paint presets available to you in Studio Artist 4. By working with different kinds of paint presets you could radically change the visual appearance of the path start regionize painting process.
We also used a Max Saturation Color Mode option in the Paint Color Source control panel to give a more impressionistic look to the simulated oil paintings. By adjusting the individual controls in the Paint Color Source and Paint Color Modulation control panels you could radically change the coloring appearance of your oil painting. Or by choosing different factory paint preset or designing your own you could emulate an infinite number of different artistic media styles and resulting visual aesthetics.
For More Information
Here's a Studio Artist 4 tip that discusses Paint regionization.
Here's a link to some downloadable Studio Artist 4 paint presets that emulate some of the paint regionization styles discussed above.
The Paint Synthesizer chapter in the Studio Artist User Guide pdf includes detailed descriptions of all of the various paint synthesizer editing controls discussed above.Labels: path start, regionization


