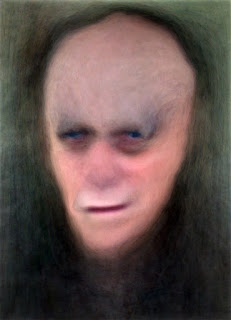
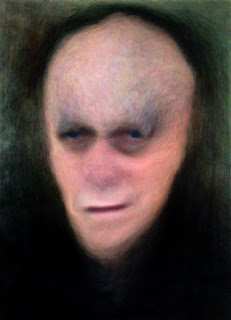
The image above is an example of stack filtering a series of painted portrait images. The individual painted portraits were generated in Studio Artist by artist Michael Wright, and are documented in his ongoing personal portrait virus blog.
The Studio Artist generated image shown above is an example of stack filtering 197 individual painted portraits used as input to a stack filtering process. This particular stack filtering process generates a normalized average of all of the individual painted portraits. So in some sense you could think of it as being the 'generic' self portrait of Michael (based on the series of painted self portraits he created which were used as input to the stack filtering process).
Another way to view this particular stack filtering effect is that it acts as a kind of visualization tool that allows you to visualize various properties of the set of input images feed into it. This is just one of an infinite variety of potential stack filtering effects. We will explore how it was created as well as different variations on the mechanics of stack filtering below.
What is Stack Filtering?
Stack filtering is an approach to building artistic imagery by processing a series of individual images (the stack) as input to some kind of algorithmic processing effect that generates a single output image. Multiple images in, one image out. I think stack filtering can produce some amazing effects that are quite unique from what you may be familiar with for creating digital art, so we'll be discussing the whole process of stack filtering below in detail.
We recently discussed a specific example of stack filtering in a previous news post.
I've been told that some people find the 'stack' terminology confusing, so just think of the stack as being a folder of images if that makes visualizing the process easier. The key point to get is that you are using a set of multiple images as an input to some kind of processing effect that will take those multiple image inputs, process them in some way, and then output the result as a single processed output image.
Normal canvas layering could actually be thought of as a kind of stack filtering, so there's an example that everyone is familiar with. The 'stack' metaphor is much more literal when you think about a stack of layered images. However, the kinds of processing effects used for layer compositing are rather limited, just % mix and the composite operation itself. And the composite effects are sequential from image to image, 2 images in and one image out in series through the individual layers.
Stack filtering is different from layers in that you can have an arbitrary number of input images to the stack filtering algorithmic process. And the range of potential processing algorithms is dramatically expanded over simple layer mix and composite operations.
Most stack filtering processes are also non-real time, so you setup the stack filtering effect and then wait for the output to be generated. The time to generate the processed effect could be almost instantaneous or could take several minutes to run depending on what you are doing and how many individual images are used as input to the stack filtering process.
My initial conception of the stack filtering concept involved taking a temporal image processing effect and using a stack of arbitrary images as input to the temporal or time-based image processing effect. Temporal image processing effects are designed to process movie files. They different from normal image processing effects (which can also be used to process movie files), because they use multiple movie frames as input to the temporal processing effect.
If you are processing a movie file with a normal image processing effect you are processing a single input frame to generate a single output frame. Temporal image processing used multiple input frames to generate a single processed output frame.
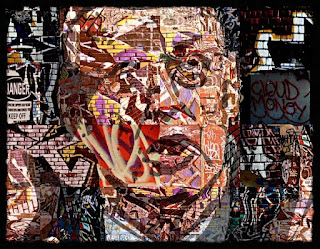
Here's an example of an early stack filtering experiment I tried, using a folder of random graffiti images to build the image stack, and then using a temporal motion reduction filter to process the stack of graffiti images.
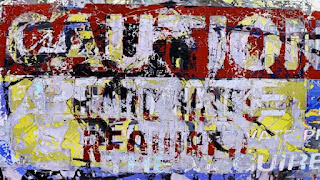
So this initial notion of stack filtering is an example of subverting a processing effect. Taking some normal process, and turning it on it's head, or twisting it around and using it in a different way than it was normally intended to be used. In this particular case, rather than using a movie file of sequential frame images from a video as input to a temporal image processing effect, you build a movie file from an arbitrary collection of individual images and then use this 'stacked image' movie file as input to the temporal processing effect.
The temporal processing effect will think that the set of individual images you used to build your stacked image movie are sequential frames in a video. And will try to process them accordingly. So if the temporal processing effect is based on computing motion from frame to frame, it will try to do so, but using your set of unique frame images that are not based on normal video.
Relationship to Movie Brushes
Studio Artist users who have worked with movie brushes or with building photo mosaic effects from movie brushes should be familiar with the concept of converting a folder of images into a movie file. The details of how to do this are described in this Studio Artist tip on building a movie brush to create a photo mosaic effect.
The same custom movie brush used as the basis for building a photo mosaic image could be used as a source movie within Studio Artist to generate stack filtering processing operations. In both cases a series of individual image files in a folder are converted into a single movie file that acts as a container for the set of images. The set of images encapsulated in the movie file are then used to create an artistic effect.
The same artistic decisions used to compose a set of images for creating a photo mosaic effect also apply to building a set of images for stack filtering effects. The images could be totally disparate with no specific interrelationships. Or they could be specifically chosen to relate in some way. It all depends on what you are trying to achieve artistically. Your initial decisions about which images to use will affect the output of the stack filtering process.
Stack filtering at some level is all about exploring the similarities or differences of the individual images used to create the stack. It's also different from photo mosaic effects in that the specific ordering of images in the stack is going to influence the output of the processing effect for most stack filtering operations. That is typically not the case for photo mosaic image generation based on the use of movie brushes.
Creating the Generic Self Portrait
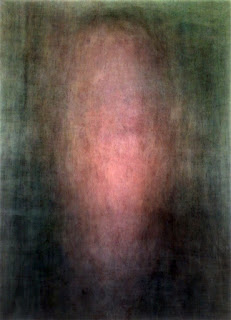
As mentioned above, the stack filtering example shown at the top of this post can be thought of as the generic portrait from Michael's self portrait virus project. Here's a slightly different stack filtering variation of this particular effect.
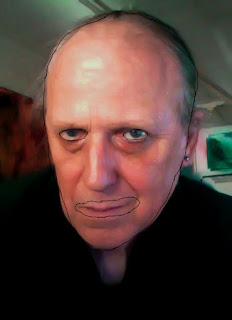
The effect was generated by using a temporal image processing effect available in Studio Artist 4. It's also based on using a spatially normalized set of images for building the image stack. What this means is that Michael's individual painted portraits were inverse warped to spatially map to a specific 'standard' portrait. The standard portrait was just one of the self portraits that was chosen to be used as the standard. All of the other individual portraits were then inverse warped to spatially match the feature positioning in the standard portrait.
So, there are 2 different components to building this particular stack filtering effect. A source movie was first constructed from the original series of Michael's self portraits. This movie was then used as a source movie in Studio Artist for the inverse warp processing. Each frame in the source movie was inverse warped to match the standard portrait. The set of inverse warped portraits was then used as the set of source images for stack filtering.
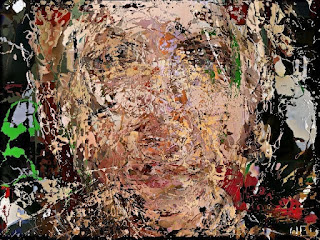
Of course you don't have to perform the spatial normalization step to generate stack filtering effects. The example below shows the same stack filtering time based avering effect used to create the generic portrait at the top of the post, but using the original portraits as opposed to the spatially normalized portrait stack.
Note that there are similarities and differences between this stack filtered image and the one at the top of this post. Again, if you think about the stack filtering operation as being a visualization tool, then this processed image tells us something about Michael's set of self portraits. It tells us that on average they do tend to be centered. It also tells us something about the shape of a head.
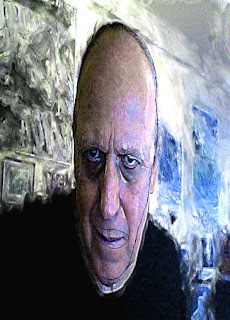
But the details of the facial relationships between the individual self portraits is lost. Adding the additional spatial normalization processing lets us examine those details as a part of the stack filtering process. For example, the image below shows a different stack filtering effect applied to the entire stack of normalized portraits.
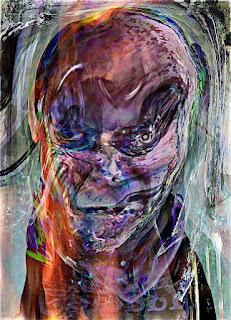
Running the same stack filter effect using the original portrait images generates the very different image shown below.
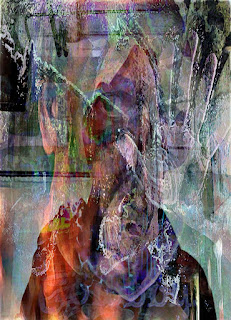
Both images are interesting. Whether you choose to use some kind of spatial normalization as a part of your personal stack filtering process is really a function of what you are trying to achieve.
For many applications of stack filtering effects a spatial normalization processing stage is not necessary. For the particular case of working with Michael's painted self portraits as input to the stack filtering effect and what processing effects i was trying to achieve, spatial normalization was very useful because it enabled me to focus on features of the facial portraits and the inter-relationships between facial portraits as opposed to focusing on the variations of where the faces are positioned, which is what the stack filtering of the original portrait stack focuses on examining.
Building the Inverse Warp Normalized Stack
A single step paint action sequence (PASeq) was used to do the inverse warp processing. The PASeq used an Inverse Warp Context action step to perform the inverse warp processing.
The standard portrait image shown above was used as the first frame of the source movie for processing. A set of bezier curves were drawn around the features of interest. For this particular experiment a very simple set of marker paths were used to define the face normalization. A bezier path was drawn around each eye, the mouth, and the overall head. So 4 bezier paths are used for each frame in the source movie. They are recorded as a series of keyframes for the single inverse warp context action step in the PASeq timeline.
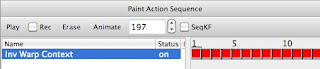
It's easy to use Studio Artist's bezier editing features to do the frame by frame bezier curve editing to build the inverse warp keyframes. I used the source onion skin transparency feature as an aid in editing the individual curves from frame to frame. The image below shows the edited set of 4 bezier curves used for the inverse warp keyframe for a frame image different than the initial standard frame image.
Inverse Warping is a specific kind of warp operation that matches each subsequent frame to the initial frame. So the bezier curve positions in the first frame define the standard positioning and the curves in subsequent frames along with their associated image feature areas will be warped back to the standard positions. This is the inverse from how a normal warp works. Inverse Warping is a new feature in Studio Artist 4 that makes it very simple to perform this kind of spatial normalization effect.
Studio Artist 4 uses Context action steps to perform actions such as warping, morphing, spatially variant filtering. The Context action steps can store references to specific image or movie files as well as sets of bezier curves whose movement is used to define the warp or morph operations. This new approach to warping and morphing is much easier to use than the old Timeline Animation Operation mode approach in earlier versions of Studio Artist that worked with the old Layer Timeline.
For More Information
Stack filtering is a powerful new approach to building artistic processing effects. I hope this detailed post will get you thinking about how to use stack filtering to create your own artwork in Studio Artist.
For more information on my personal explorations with stack filtering Michael Wright's portrait virus imagergy check out this portrait virus mutations blog. More information on Michael's portrait Virus project can be found here.
Studio Artist 4 has a wide range of different temporal image processing effects. Here's a news post that provides an overview of the temporal processing effects. For more detailed information on working with temporal image processing effects check out this tip.Labels: michael wright, portrait virus, stack filter, time-based processing, warp


