Movie Brushes are a powerful feature in the Studio Artist paint synthesizer. You can use them to create endless varieties of textural patterns in your paintings and photo mosaic imagery created with the paint synthesizer. This could take the form of full photo mosaic effects that try to reproduce the source image with a series of sub images that are appropriately positioned to represent the source image. Or it could be used for more subtle background texturing where the individual movie images are colorized on the fly by the paint synthesizer.
In response to some questions in a Studio Artist User Forum post recently about building brick wall textures i decided to post some preset examples. These examples are all Studio Artist 3.5 presets and you can download them here.
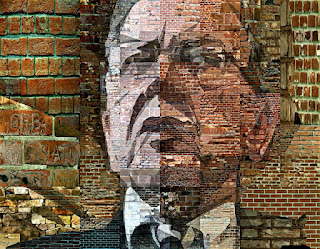
All of these examples use the same brickBrush movie file for a movie source brush. The brickBrush movie was created by first placing a series of photos of brick walls in a folder. I then made a simple Paint Action Sequence (PASeq) that sets the canvas to the source image. I then ran an Action menu command to process a folder of images with the PASeq to a movie file. This generates a movie file that contains all of the images in the folder you choose to process, in this case the brick wall images i wanted to use for my movie brush. You can run the File : Paint Synthesizer : New Movie Brush menu to open a movie file as a new movie source brush.
The different presets show off different mosaic styles you can create using the region as brush pen mode in conjunction with Studio Artist's path start regionization features. Path Start regionization has been discussed on this blog recently. When running a path start regionization preset, Studio Artist first visually analyses your source image and then paints it as a series of individual regions. The painting could be done with paint strokes that fill the generated regions in various ways, or in the case of these preset examples the regions themselves are filled in with individual movie frames from the movie source brush.
The trick with using a movie source brush with the region as brush pen modes is to set the Brush Option control in the Region as Brush Mode control panel to Alpha Only. Normally the Region as Brush pen mode replaces the source brush with it's generated region when drawing. But you don't want to replace your movie source brush, just build an alpha channel for it, and this setting will do that. Of course, you need to switch your Brush Type to Source Brush Alpha to take advantage of this. And you always need to make sure the PathStartRegionize control in the Region as Brush Mode control panel is turned on when using path start regionization with this pen mode.
In addition to the different paint presets included in the preset example download, there is also the movie file used for the movie source brush (called brickBrush). You should place the brickBrush file in the Brush folder in your main Studio Artist folder so that Studio Artist will be able to find it when running these presets. If you don't, you will get a dialog asking you to find the movie file.
There is also a paseq preset that shows how to build regionization painting off of regions generated by the vectorizer. This technique on working with the vectorizer to define regions for the paint synthesizer was discussed in this previous blog entry.
By using the run the File : Paint Synthesizer : New Movie Brush menu you can load your own custom movie files into any of these presets and build photo mosaic effects with your own set of custom images. There are many different ways to build photo mosaic effects in the Studio Artist paint synthesizer. Check out the Graffiti Brushes category in the 3.5 Collection of factory paint synthesizer presets for a completely different example of how to work with movie brushes to create mosaic effects.Labels: movie brush, photo mosaic, preset, regionization
